-
×
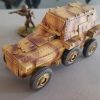
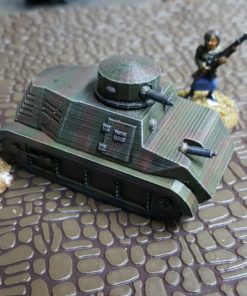 Spanish Civil War Trubia Naval Tank
- Created by:
DeweycatProductions
Subtotal: $5.00
Spanish Civil War Trubia Naval Tank
DeweycatProductions
Subtotal: $5.00


$4.00
** 09 January 2021 – this file has been updated with a specific one piece Resin .stl, plus the 8 part FDM file has been reworked for cleaner printing and post print fit**
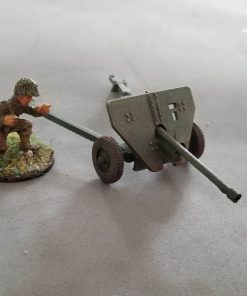
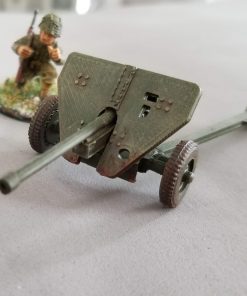
This is an original file, to enable you to print a 28mm scale model of the WW2 Japanese Type 1 47mm ATG. The file is optimized for FDM printing, and consists of eight parts.
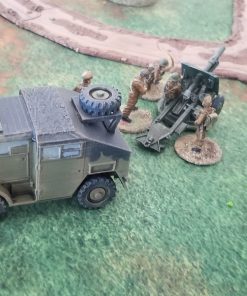
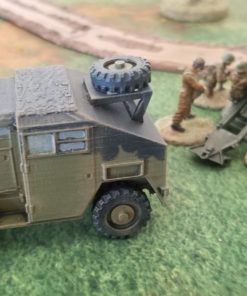
Japanese Type 1 47mm Anti-Tank Gun
The Imperial Japanese Army are generally underrepresented in the Bolt Action community. The Pacific theatre has always been a “second front” in gaming; it lacks the visual eye candy of open fields full of mammoth tanks facing off in combat. The Japanese themselves did favour their navy as the prime mover for their military strategy, and their ground forces were a poor cousin to the Navy, and generally lagged western armies in armaments. But the game does provide a wide range of options for Japanese units and special rules.
Despite this, the Japanese did react to setbacks in battle, and make what corrections they could. One such setback was the bruising clashes they had with Soviet forces in Manchuria in 1939. The highly mobile forces under General Zhukov taught the Japanese a sharp lesson; enough to cause them to redirect their war aims to the South Pacific.
The ineffectiveness of their existing anti-tank guns led to the development of the 47mm Type 1 ATG. The Type 1 number was designated for the year the gun was accepted, 2601 in the Japanese imperial year calendar, or 1941 in the Gregorian calendar.
It was an entirely indigenous design, although some articles claim it was developed from the Soviet 45mm ATG. There doesn’t appear to be any major similarities between the two; the Type 1 has a different breech block system, traverse system, etc. I support the that it was a strictly home-grown design.
There were over 2,300 manufactured during WW2, and it served throughout the war with the IJA’s actions both in the Pacific and in China. It had good armour penetration and was able to pierce the frontal armour of an M4 Sherman tank at common battle range. Combined with the demonstrated talent of the Japanese at digging in and camouflage, it posed a real threat to any Allied AFV it faced.
The Type 1 in Bolt Action
The Type 1 ATG is classed as a Medium Anti-Tank Gun in Bolt Action. The design itself is quite modern looking; with a split, square tubed trails, a steeply sloped gun shield and the low profile for the gun.
The .stl
This design was done up after I received a request online. The file is entirely from scratch. I did have difficulty getting the measurements right; I worked from the only stat readily available; that being the barrel length. I worked from photos of the gun and what descriptions I could find. This model represents the Type 1 that used hand cranks for traversing; some used a shoulder press instead.
The model is optimized for FDM printing, at 0.1mm layers with supports. There are eight (8) pieces to the .stl;
I suggest that after printing and cleaning off the support material, dry fit all the pieces. I purposely make for a tight fit, so you may need to carefully trim/file in a spot, but if you do so, do so judiciously. I didn’t have to do any trimmings after removing the supports on my test prints.
Lastly the trunnion fits onto the round protrusion of the axle. You may choose to glue this or leave it loose.
You are not logged in

Reviews
There are no reviews yet.