Chapter 5 – Actually Printing Something!!
Chapter 5 – Actually Printing Something?
In this chapter we will give a quick overview of the process of printing on an FDM (printer) printer. I will keep this as generic as possible, due to the many variances among makes when actually setting up before commencing a print. Each printer will be different, and you will have to rely on the manuals and guidance of the manufacturer of your new printer, and more so on the members of the many Facebook groups of owners, who are generous to share their experiences in blazing the trail before you.
But what happens in the process? What should you try to do, or to avoid doing, to help ensure your best opportunity for a success print? Let’s start going through the process.
What does you printer need to make something?
Beyond the obvious tangible items an 3D FDM printer needs before you start your print- like a readable .stl file and filament loaded into the printer- you will need to have your “X”, “Y” and “Z” axis correctly aligned. This is the basic starting point for any print and is the cornerstone for all 3D printers. If you have ever built a backyard shed, a deck or a piece of furniture, then you were utilizing that process – you want all dimensions – the length, width, and height – to be square and true.
The difference is you did this while you built that shed or deck – by using a level to ensure your work remained true. In 3D printing you must do this before you start. Unlike in your carpentry project, you cannot correct that misalignment after you press “print”.
Each printer will have a different process for the calibration adjustments. Some printers have an automatic Z calibration at the start if a print; Prusa is one that does. Others will leave it to you to check the calibration. No matter what, this is time well spent. Take your time, and as always, remember you have a fall back in the Facebook and YouTube community to walk you through it.
There are numerous files on Thingiverse for calibration print, and likely your printer has come with some similar files. Just go to the Thingiverse search engine and type in “calibration test”; chose a file that has a lot of downloads (indicating it is popular for a reason, otherwise there is no “ranking” of the files on this site) and give it a run. It is always better to do your cussing now instead of after a 12-hour mangled print on your Tiger tank.
Okay I get that. But how does this all work?
As I noted at the start of this series, I am a complete technophobe. I am entirely self-taught – well, with ample tutelage from the on-line 3D printer community. So, let’s not get caught up with the overwhelming issues of CAD design and the multiple file format.
Let’s talk about CAD, just for a minute
First, you do NOT need to know how to use CAD. It is just that I have mentioned CAD before – that is Computer Aided Design – and it is how all designs that are 3D printed start. There are a seemingly endless number of CAD programs out there, and many are not specifically intended for 3D printing- some are meant for digital gaming and others for home design, for example. For instance, the popular Sketch-Up program, available as a basic free program and a fee based professional format – is geared towards designing in the artistic and practical fields. Its files can be converted but it is not geared towards the 3d printer universe.
The CAD programs for 3D printing range from those available free of charge to ones whose license will cost you hundreds or even thousands of dollars a year. Many are available for a free trail of 30 days , but then you are required to pay up. Each of them has a steep learning curve, so by the time your 30-day trial is up and you are finally just getting the hang of it, it’s “pay up or get out” time.
Some of the most common programs used by home printers are
- Tinkercad
- Fusion360
- SolidWorks
- FreeCad
- TurboCad
- Meshmixer
I have exhausted the free trial periods for many programs who offer that, and have used Meshmixer and TinkerCad, both free programs, from the start of my venture into this hobby. I have had a good taste of them. To explain the variations between them, I need to give you a metaphor – suppose you to travelled to Thailand and had to rent a car. You would expect some things to be different; they may drive on the other side of the road; their traffic laws may be new to you and there may be a few things you need to know about the car. But you still expect that the steering wheel, pedals and controls would be in the appropriate same spot as they are at home. No so with CAD programs. Each has a completely different interface, screen, and digital work surface. They are very frustrating when you get started, and if you switch back and forth you will be doubly frustrated.
Now I have to man up and admit that I almost exclusively use Tinkercad to create my files. This is sort of like Jamie Oliver admitting he prepares all his recipes in an Easy-Bake oven. It is considered to be CAD with training wheels.
The thing is TinkerCad is what I started with, and I have learned how to work through its many faults and limitations. With it I have created over 100 3d files, which can be located on both my CGTrader and Thingiverse.
https://www.cgtrader.com/deweycatproductions
https://www.thingiverse.com/deweycat/designs
It can be done, although there are limitations as to file size etc. If you told any certified 3D designer that you are using files created by someone who did all the work on TinkerCad, they would roll their eyes. Yet it works for me. It’s only a hobby to me, and I can work within the limitations of the free program.
Any other good free sites?
Another great site is https://makeprintable.com
Here you can load an .stl or .obj file that you think is a bit dodgy and it will perform the corrections to – as their name says- make it printable. If you sign up you can use it on up to three files a month, after which you are locked out, or you can subscribe to it for a monthly fee. I was subscribing to it but couldn’t justify the cost it once I gained more experience in corrected flawed files myself. It is a good site to bookmark for later.
Hey, you told me I didn’t need to use CAD to print, so get on with it!
Okay, so let’s skip CAD for now. You will still need to use a piece of software. This is called a “Slicer” program. The Slicer program takes the digital data from the .stl and converts it into a code that the printer can read and use to lay down your print. This is called a “gcode”.
Your 3D printer likely comes with its own slicer program, and you should start with that. Most people do move on to another Slicer program, just because they tend to be more versatile and receive more attention in upgrades. Additionally, the more common programs have a larger user base which you can follow to guide you. With my Prusa I started with their Slicer program, Prusa Control. I moved to Cura, though, which I found both more intuitive and I was better able to fine tune my settings. There are other Slicer programs and it all comes to what you find best suited to your needs.
The process you will follow is to load your 3D file – normally an .stl, but perhaps a different format of file, but let’s stick with .stls – into your program. The file will show up on an image representing your build plate. You will want to ensure the model is flat on the build plate; this is important, as you “can’t print on air”; you must have something starting on the build plate to have anything higher up on you build.
You may want to load the file, if it has multiple parts, one part at a time. The reason for this, as opposed to loading up your build plate with all the parts, is that if something goes awry, you will have only lost the time and filament for one piece, not an entire print.
What settings you use will likely be both recommended in your own printer, plus the information provided by your filament manufacturer ( we covered that a few chapters ago). You will need to adjust as you try different temperatures, speeds, etc., but is will all come together.
The biggest tip I could make is that to remember that a lot of files on Thingiverse are not printable; others are printable but were designed for an SLA printer, which has a different method of aligning he model on the build plate, so the model itself is fine, but you are going to have to move its placement to suit your printer’s build plate. For example, you will find a lot of prints standing on their end – e.g. the wonderful m-bergman files off Thingiverse. They were test printed on an SLA printer, and are all standing on their end. You need to rotate those to be horizontal to the bed.
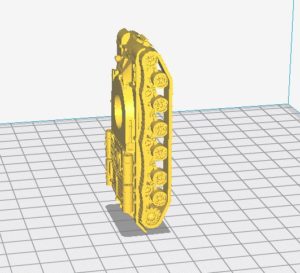
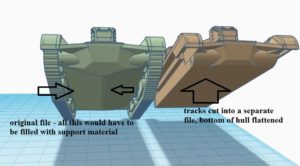
Number one task is to maximize the contact with the build plate. If you look at the .stls I have on thingiverse, you’ll see that I have cut the tracks of the tanks and the wheels off the wheeled vehicles and made the hull flat to the build plate. Other creators do the same. Without this, the gcode must include support material for all the voids under the hull and between the tracks. That requires you to clean that all out, post print. It can be nasty.
Here is the difference between the original hull of Tiger Ace 1945’s British A-9 Cruise,r from his excellent Early War British collection, next to the same hull after I cut the tracks into separate files and flattened the bottom of the hull on CAD. Only a real rivet counter would flip the tank over and complain that your model is missing the “V” shaped hull of the A-9.
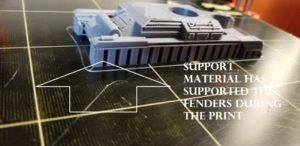
Even with that, the printer needs support material throughout most of your prints.
Here is the printer building that hull from the bed; I have shown the support material which will support the overhanging fenders of the tank.

Here is that same A-9 on the build plate. The arrows show the support material which you will clean out, post print.
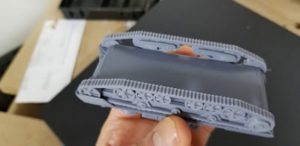
Here is a pic of that same A-9, with the tracks attached. The tracks were printed laying flat on their sides on the bed as well.
A quick review
- CAD is how the files are created, by creating an .stl. You don’t need to know CAD to print, but you may want to get into it and play around with a file to see what can be done.
- Gcode is how your printer knows what to do to print your model. You get that gcode from a slicer program.
- So, first ensure your printer is properly calibrated, that you have a good .stl, and that the settings on the slicer program suit your print, your printer and your filament.
- If something turns out poorly, don’t fret, just start surfing the net with the issue and you will be able to isolate some adjustments to try. Keep your first prints simple, don’t try a 20-hour print and go to bed hoping the guardian angel of 3D will look after you. The printer angel ends up doing a lot of weeping.
- Remember the old adage : “It takes a village to ensure a good 3d print”… something like that. You are part of a community, and its members have knowledge and tips they are more than willing to pass on. If you can take a photo of your problem, post into a Facebook group. Just be sure to give the info – your printer, filament, bed and extruder temperatures, and what went wrong. No matter what happens, it has already happened to the rest of us as well.