-
×
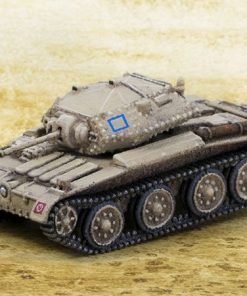
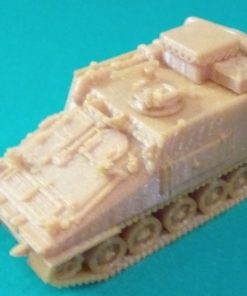 Family CVR (T) set two (FV104 Samaritan , FV105 Sultan)
- Created by:
loxfil
Subtotal: $18.00
Family CVR (T) set two (FV104 Samaritan , FV105 Sultan)
loxfil
Subtotal: $18.00


$0.00
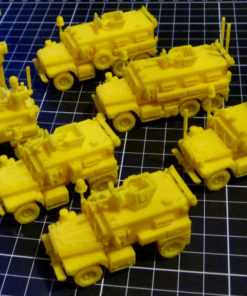
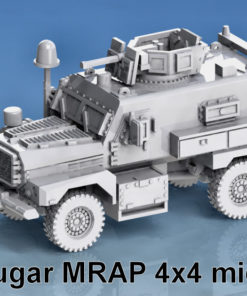
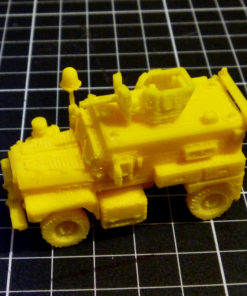
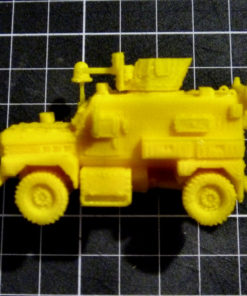
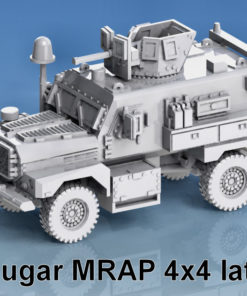
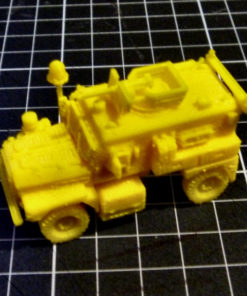
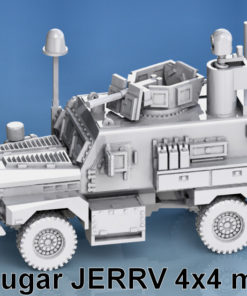
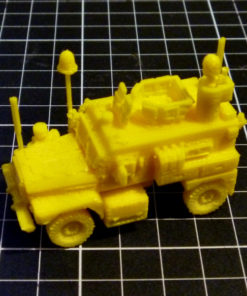
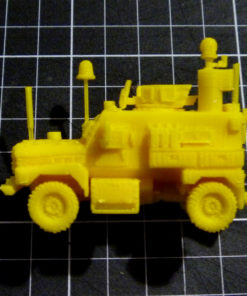
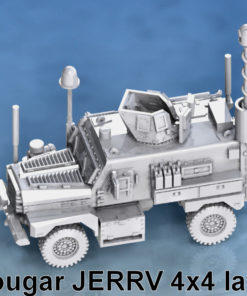
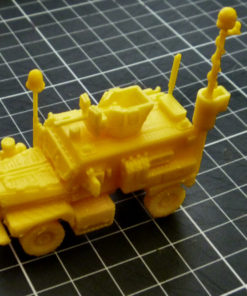
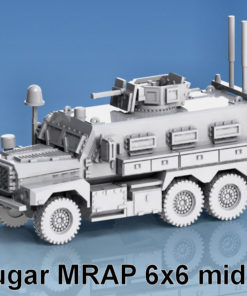
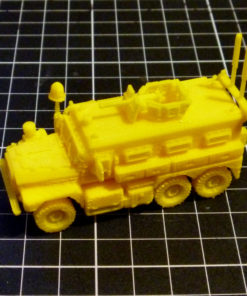
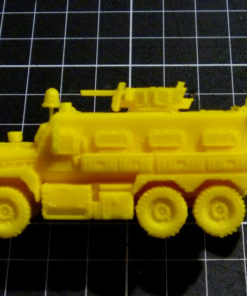
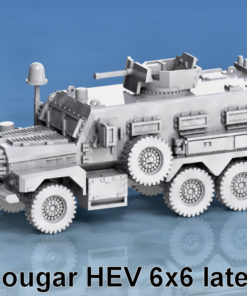
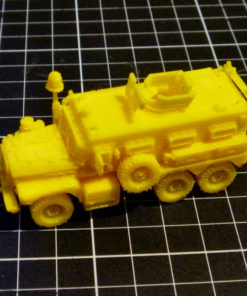
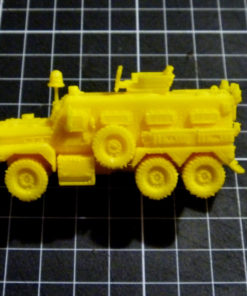
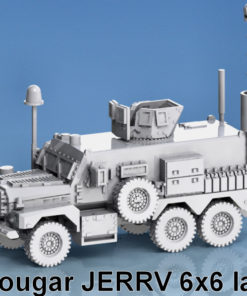
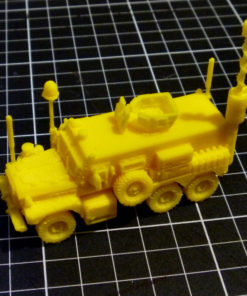
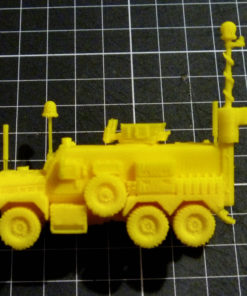
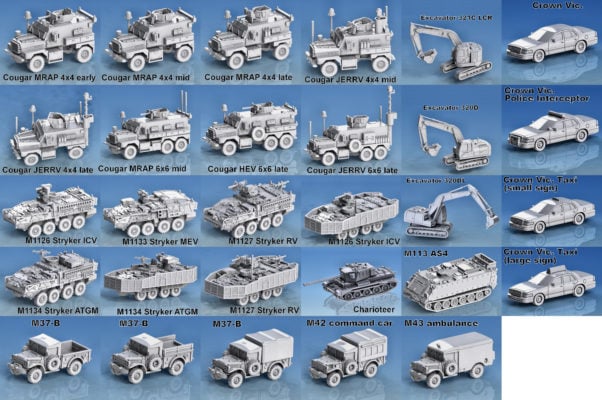
1-100 Cougar 4×4 & 6×6 MRAP
(Downloads - 693)
1-100 Cougar 4×4 & 6×6 MRAP
Please remember: CC BY-SA-NC license.
Versions included:
Cougar 4×4 MRAP early (Notched front mudguard, winch below thin bumper)
Cougar 4×4 MRAP early mid (winch below thin bumper)
Cougar 4×4 MRAP mid (winch inside thick bumper)
Cougar 4×4 MRAP late (winch inside thick bumper, reshaped rear mudguard)
All 4×4 MRAP – glue dome onto mounting plate by driver’s door.
Cougar 4×4 JERRV mid (roof-mounted unit) (also with camera ball retracted)- use JERRV-min
Cougar 4×4 JERRV late (rear-mounted unit, late mudguard) (also with camera ball retracted)- use JERRV-extended
Both JERRV – glue dome extended onto mounting plate by driver’s door.
Both JERRV – glue JERRV front aerial into socket on front mudguard.
Both JERRV – glue JERRV rear aerial into socket on rear wall.
Cougar 6×6 MRAP early (Notched front mudguard, winch below thin bumper, no dome mount, no aerial box, no storage bins)
Cougar 6×6 MRAP mid (Notched front mudguard, aerial box) (tube aerials optional)
Cougar 6×6 MRAP (tube aerials)
6×6 mid, MRAP – glue dome onto mounting plate by side door.
6×6 MRAP – glue tube aerial box into sockets on rear wall.
Cougar 6×6 HEV early (winch below thin bumper)
Cougar 6×6 HEV late (winch inside thick bumper, reshaped rear mudguard)
Cougar 6×6 JERRV (rear-mounted unit, late mudguard) (also with camera ball retracted)- use JERRV-extended
glue dome extended onto mounting plate by side door.
glue JERRV front aerial into socket on front mudguard.
glue JERRV rear aerial into socket on rear wall.
3 turrets are provided:
Early (Low shields, no wimdows)
Mid (higher shields with windows)
Late (even higher sloped shields with windows.)
All three turret versions have an open-hatch variant, and a no gun variant.
There seems to be no rule for which turret is fitted to any particular vehicle – there are photos of every combination.
If the JERRV mast is not glued in place, it can be removed for wargaming to depict a vehicle in travelling mode.
All versions have a simple version with the wheel wells filled in to the back of the wheels.
All models printed sitting on their wheels. Turrets and guns printed with gun barrels horizontal.
The tube aerials, domes & ball extended were printed horizontal, not upright.
Note that the domes have a flat on one side, which should be the bottom.
The mudflaps, rear steps and mirrors are the trickiest bits to clean up – take it slowly and carefully and you should be fine.
In all of those cases, make sure that you break any support cage before pulling the supports off, and it should be fine.
Clean the supports from the outside of the wheels first, then between the wheels, and last of all the wheel wells.
If necessary, cut in with an x-acto knife under the middle of the rear wheel well to release the supports.
Clean out the open turrets from underneath as far as possible, then push the remainder out from the top down through the hole.

My definition of Commercial Use is:
ADVERTISING MY ITEMS FOR SALE
i.e. webshop, ebay, etc.
ALL other usage is non-commercial, as far as I’m concerned.
Word-of-mouth, requests, 3D hub stuff, all OK, for free, at any quantities.
Commercial sales are licensed at 5% of retail price (ex postage, painting/finishing & sales tax).
( I don’t believe in profiting from work that isn’t my own.)
Payments are done monthly through Paypal.
100% of license fees are donated by myself to the MS Society of NZ.
If you feel the need for a commercial license, please contact me through email.
Current Modern vehicle list:
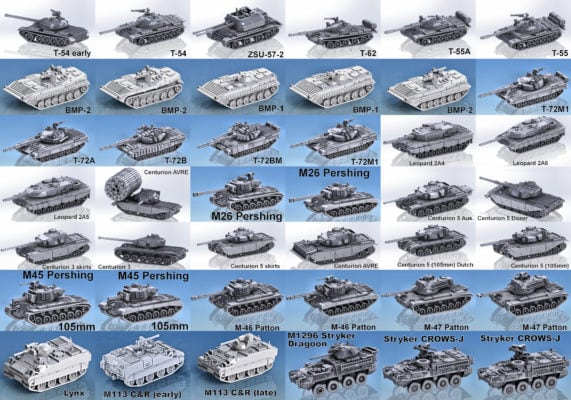
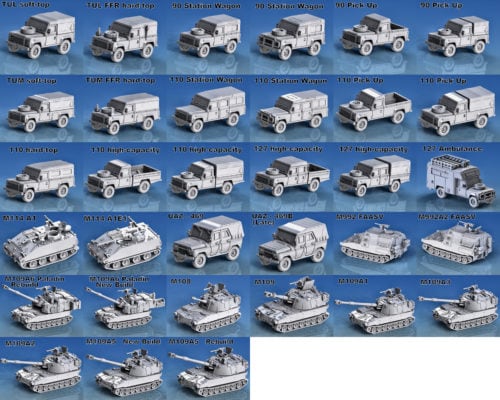
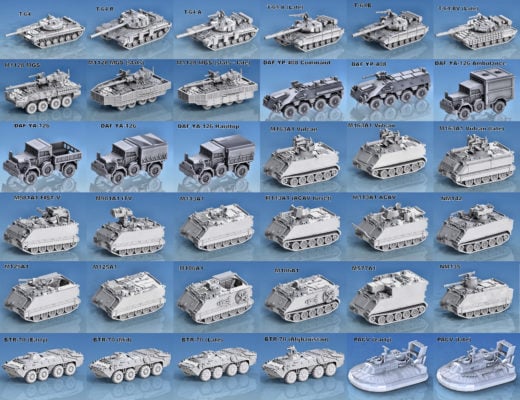
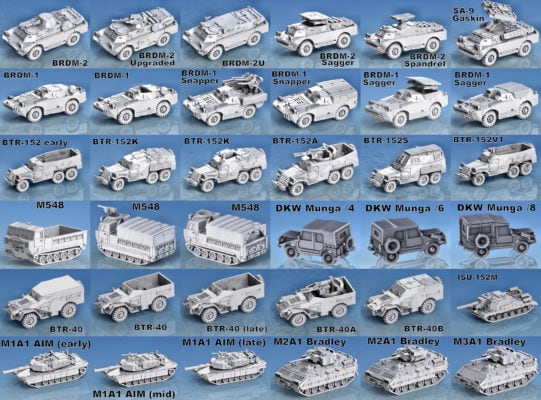
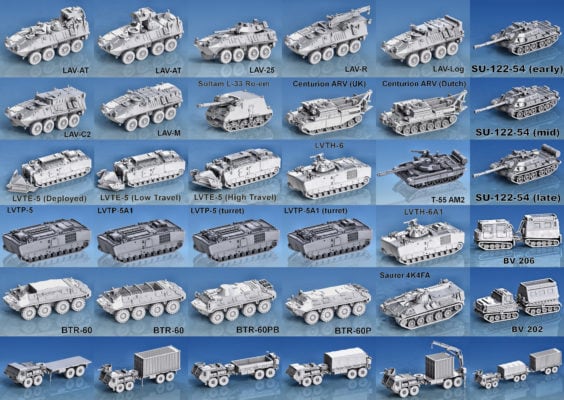
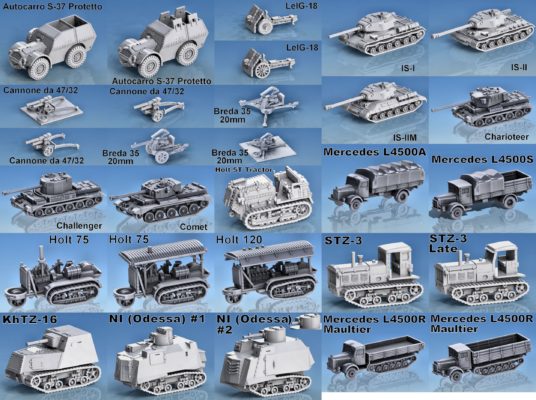
Germany:
DKW Munga /4 4 seat 1/4t field car
DKW Munga /6 6 seat 1/4t light pickup truck
DKW Munga /8 8 seat 1/4t light pickup truck
Leopard 2A4
Leopard 2A5
Leopard 2A6

UK:
Charioteer VII
Centurion III
Centurion V
Centurion AVRE
Centurion ARV

TUL
TUM
4x4 90in
4x4 110in
4x4 127in

USA:
M45 Pershing
M46 Patton
M47 Patton
M1A1 Abrams AIM
M2A1 Bradley
M3A1 Bradley
M108
M109
M109A1,A3
M109A2,A5
M109A6 Paladin
M992 FAASV
MRAP Cougar 4x4
MRAP Cougar 4x4 JERRV
MRAP Cougar 6x6
MRAP Cougar 6x6 HEV
MRAP Cougar 6x6 JERRV
M1126 Stryker ICV
M1126 Stryker ICV with CROWS-J
M1127 Stryker RV
M1133 Stryker MEV
M1134 Stryker ATGM
M1296 Stryker Dragoon
LAV-25
LAV-M
LAV-AT
LAV-C2
LAV-R
LAV-Log
LVTP-5
LVTP-5A1
LVTH-6
LVTH-6A1
LVTE-5
M548 cargo carrier
M113A1
M113A1 ACAV
M114 A1
M114 A1E1
M577A1 command vehicle
M106A1 107mm mortar carrier
M125A1 81mm mortar carrier
M163A1 Vulcan
M901A1 ITV TOW launcher
M981A1 FIST-V
Mk48/14 Dragon Wagon LVS
Mk48/17 Dragon Wagon LVS
Dodge M37B
Dodge M42B Command car
Dodge M43 ambulance

PACV SK-5 hovercraft

Hydraulic Excavator 320D
Hydraulic Excavator 321 LCR
Crown Vic.
Crown Vic. Police Interceptor
Crown Vic. Taxi

Russia:

IS-2M
IS-3
ISU-152M
T-54
T-55
T-55A
T-55 AM2
T-62
T-64
T-64R
T-64A
T-64B
T-64B1
T-64BV
T-72A
T-72M1
T-72B
T-72BV
T-72BM
SU-122-54
ZSU-57-2
BRDM-1
BRDM-1 AT-1 Snapper
BRDM-1 AT-3 Sagger
BRDM-2
BRDM-2 rebuild
BRDM-2UM command vehicle
BRDM-2 9M14M AT-3 Sagger
BRDM-2 9M66 AT-5 Spandrel
SA-9 Gaskin
BMP-1
BMP-2
BTR-40
BTR-40A
BTR-40B
BTR-152
BTR-152A
BTR-152E
BTR-152K
BTR-152S
BTR-60P
BTR-60PA
BTR-60PB
BTR-70

UAZ-469

Australia:
Centurion V (Aus)
Centurion V (Aus) Dozer
M113 AS4

Austria:
Saurer 4K4FA-G2 schutzenpanzer

Canada:
Lynx

Netherlands:
Centurion ARV (dutch version)
DAF YP-408
DAF YA-126
M113 C&R

Israel:
Soltam L-33 Ro-em 155mm SPG

Norway:
NM135
NM145 TOW launcher

Sweden:
Bandvagn 202
Bandvagn 206
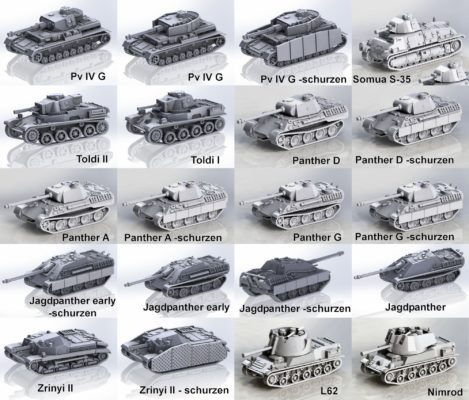
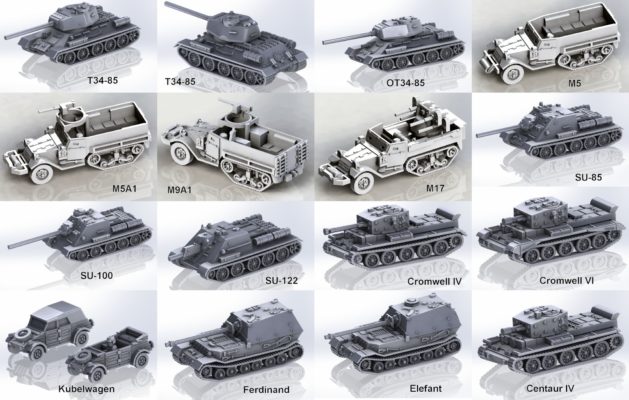
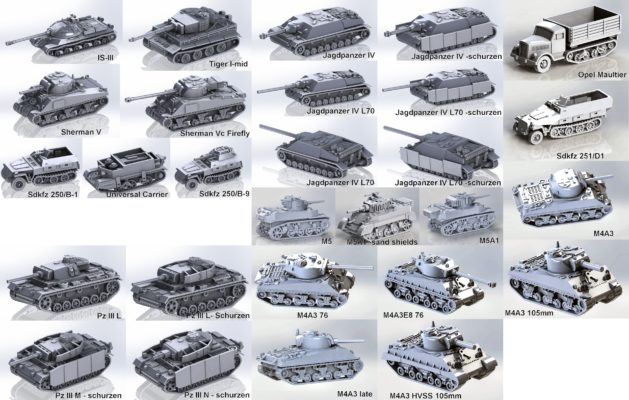
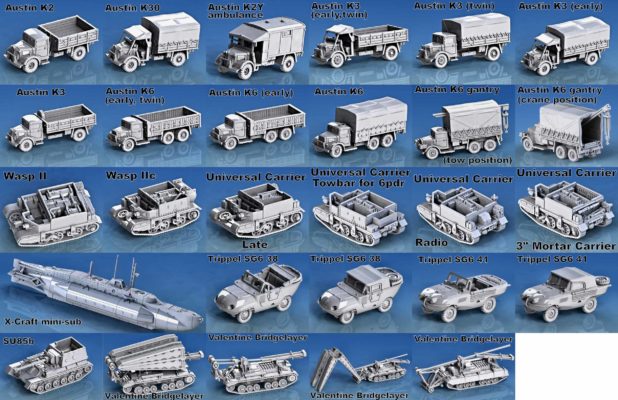
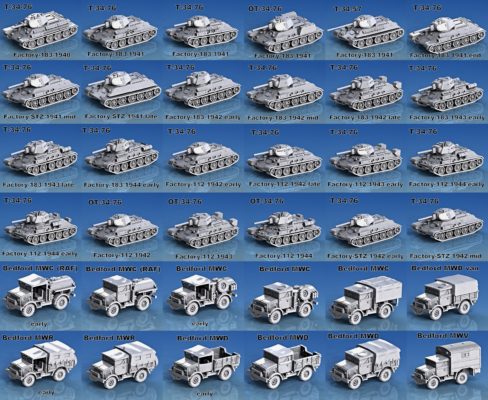
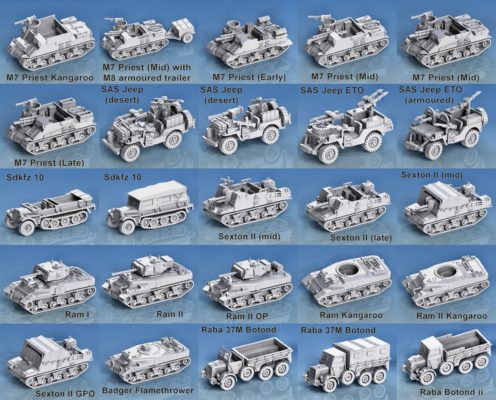
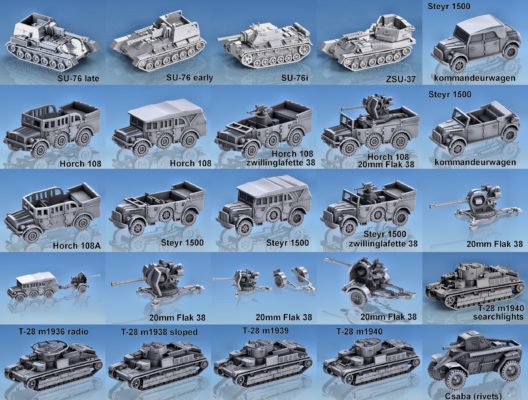
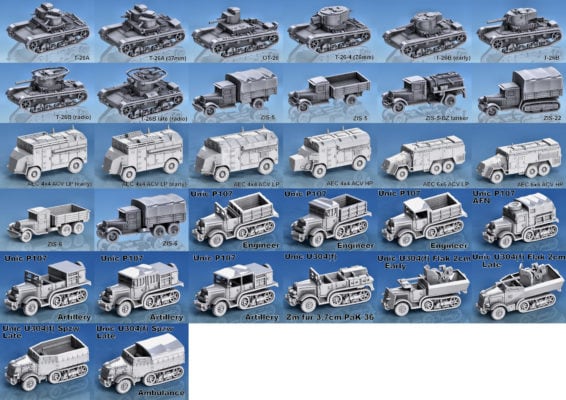
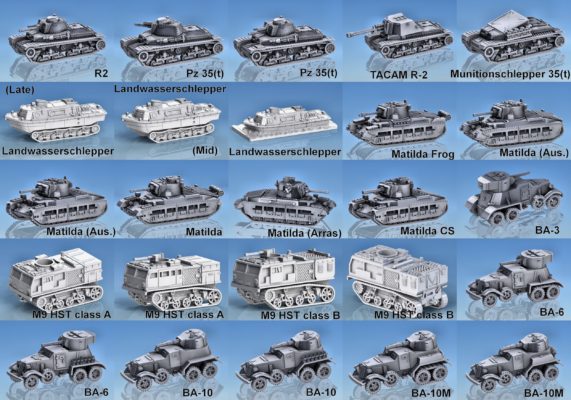
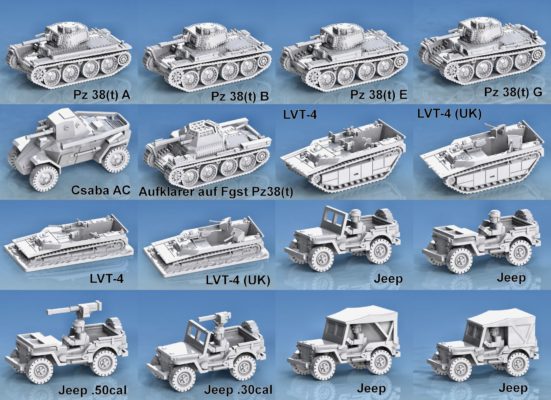
Current WWII vehicle list:
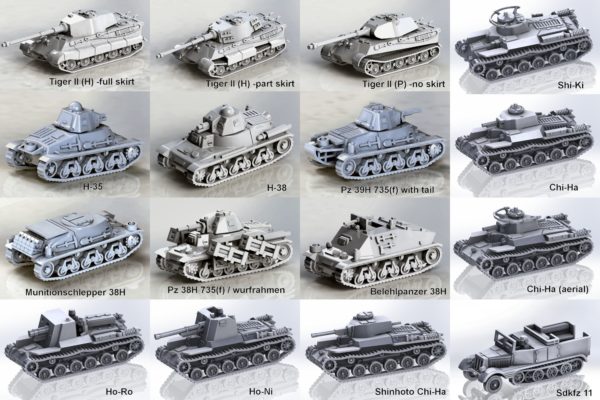
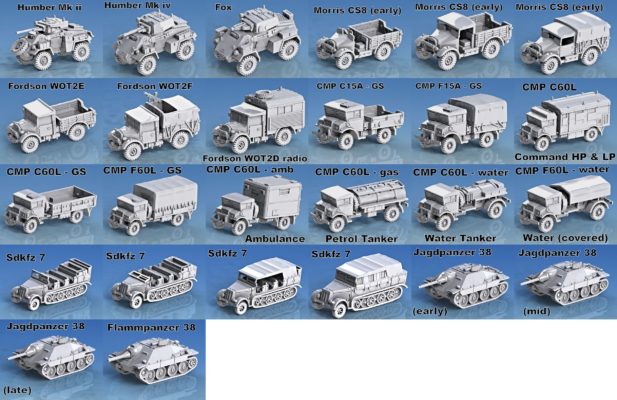
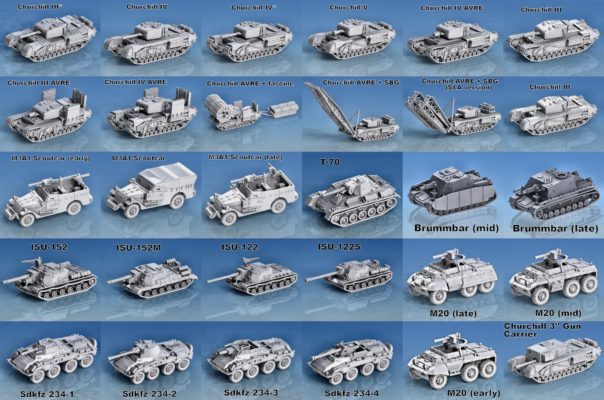
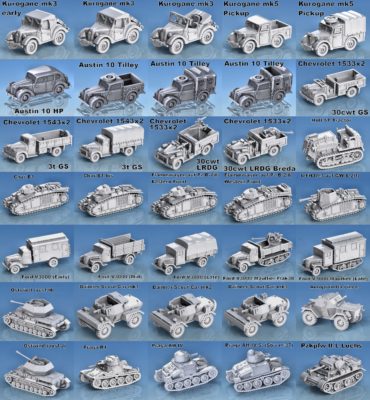
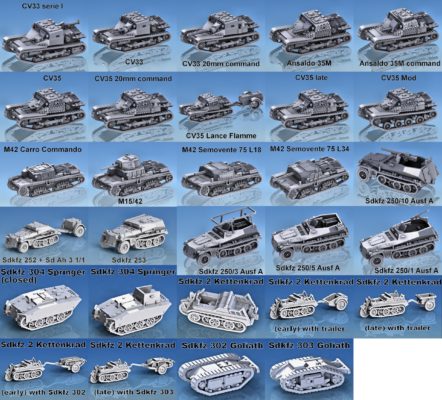
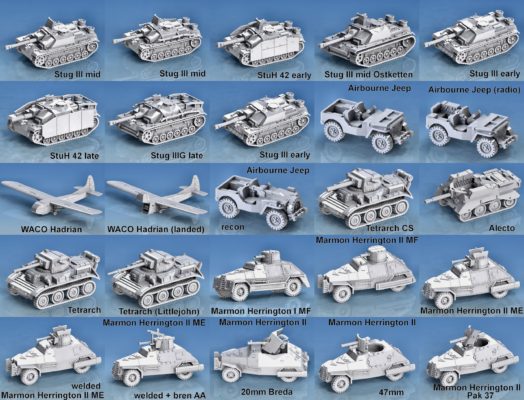
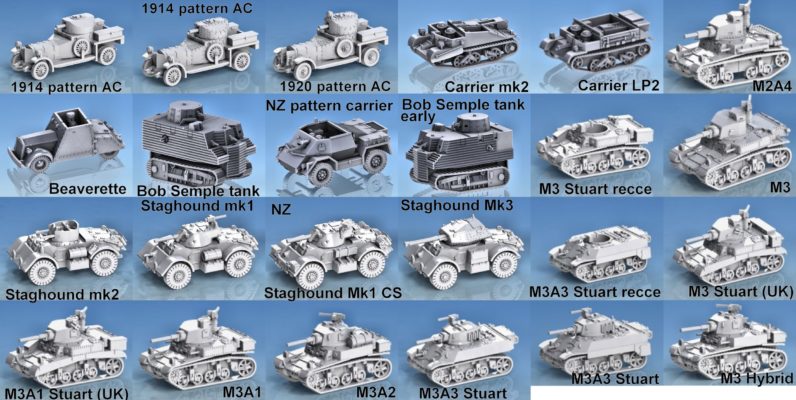
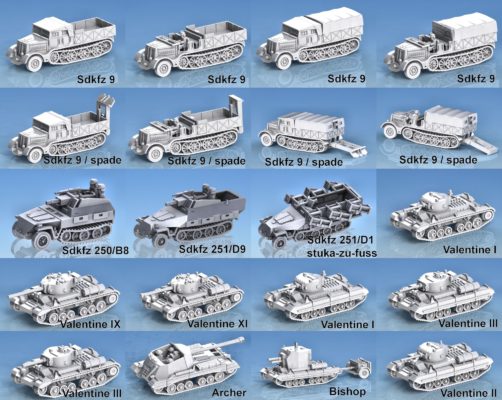
Germany:
Tiger I mid
Tiger II (P)
Tiger II (H)
Panther D
Panther A
Panther G
Jagdpanther
Jagdpanzer IV
Jagdpanzer IV L70
Pzkpfw 35(t)
Pzkpfw 38(t) Ausf A
Pzkpfw 38(t) Ausf B & C
Pzkpfw 38(t) Ausf D
Pzkpfw 38(t) Ausf S
Pzkpfw 38(t) Ausf E
Pzkpfw 38(t) Ausf F
Pzkpfw 38(t) Ausf G
Aufklarer auf Fgst Pzkpfw 38(t)
Pzfpkw II L Luchs
Pzkpfw III L
Pzkpfw III M
Pzkpfw III N
Pzkpfw III flamm
Stug IIIG
StuH 42
Pzkpfw IV G
Ferdinand
Elefant
E-100
Ostwind
Sturmpanzer IV Brummbar
Jagdpanzer 38 Hetzer
Flammpanzer 38

Sdkfz 234-1
Sdkfz 234-2
Sdkfz 234-3
Sdkfz 234-4

Sdkfz 250/A1
Sdkfz 250/A3
Sdkfz 250/A5
Sdkfz 250/A10
Sdkfz 250/B1
Sdkfz 250/B8 stummel
Sdkfz 250/B9
Sdkfz 251/D1
Sdkfz 251/D1 stuka-zu-fuss
Sdkfz 251/D9 stummel
Sdkfz 252 Leichter Gepanzerter Munitionskfaftwagen
Sonder Anhanger 3 1/1 ammunition trailer
Sdkfz 253 Leichter Gepanzerter Beobachtungskraftwagen
Sdkfz 2 Kettenkraftrad
Sdkfz 7 KM m11
Sdkfz 10 ausf B
Sdkfz 11
Sdkfz 9 Famo
Sdkfz 9 Famo with spade
LWS (Landwasserschlepper)
Opel Maultier
Ford V3000 Maultier
Kubelwagen
Trippel SG6/38
Trippel SG6/41
Horch 108 / 108A
Steyr 1500
Steyr 1500 Kommandeurwagen
Ford V3000
Mercedes L4500S
Mercedes L4500A
Mercedes L4500R Maultier

Morserzugmittel 35(t)
Belehlpanzer 38H
Munitionschlepper 38H
Pzkpfw 38H 735(f)
Pzkpfw 38H 735(f) with wurfrahmen
Pzkpfw 35S 739(f)
Pzkpfw B-2 740(f)
Flammwagen auf Pzkpfw B-2(f)
10.5cm leFH18/3 auf GW B-2(f)
Unic U304(f) artillery tractor
Unic U304(f) 2cm Flak early
Unic U304(f) 2cm Flak late
Unic U304(f) Schutzenpanzerwagen late

Sdkfz 302 Goliath (electric)
Sdkfz 303 Goliath (petrol)
Sdkfz 304 Springer

20mm Flak 38
75mm LeIG-18

UK:
1914 & 1920 pattern Armoured Car
Dorchester 4x4 ACV (LP & HP)
AEC 6x6 ACV (LP & HP)

Tetrarch
Tetrarch CS
Alecto
M3 Stuart (UK)
M3 Stuart Hybrid
M3 Stuart Recce
M3A3 Stuart
M3A3 Stuart Recce
Centaur
Cromwell
Challenger
Comet
Sherman V
Sherman VC Firefly
Matilda II (BEF)
Matilda II
Matilda II CS
Valentine I
Valentine II
Valentine III
Valentine IX
Valentine XI
Valentine III Bridgelayer
Churchill III
Churchill III (75mm)
Churchill III AVRE
Churchill IV
Churchill IV (75mm)
Churchill IV AVRE
Churchill V (95mm howitzer)
Churchill AVRE with fascine and fascine sled
Churchill AVRE with SBG bridge
Churchill 3" Gun Carrier
Bishop
Archer
Sexton II
Sexton II GPO
Ram II OP
Universal Carrier
Universal Carrier 3" mortar carrier
Wasp II
Bren Carrier No2 Mk1
M7 Priest Kangaroo
Ram I Kangaroo
Ram II Kangaroo
M5 halftrack
M9A1 halftrack
LVT-4 (armed, armoured)
LVT-4 (armed, armoured) with Polsten cannon
Daimler Scout Car mk1 Dingo
Daimler Scout Car mk2 Dingo
Daimler Scout Car mk3 Dingo
Humber Mk II armoured car
Humber Mk IV armoured car
Staghound I
Staghound II
Staghound III
Staghound AA
Airborne Jeep
Airborne Jeep - Recon
SAS Jeep - desert (LRDG jeep essentially the same)
SAS Jeep - ETO
SAS Jeep - ETO armoured
Austin 10 HP
Austin 10 Tilley
Austin K30
Austin K2
Austin K2Y Ambulance
Austin K3
Austin K6
Austin K6 Breakdown Gantry
Bedford MWC
Bedford MWD
Bedford MWR
Bedford MWV
Morris-Commercial CS8 15cwt
Fordson WOT2 15cwt
LRDG Chevrolet 30cwt
LRDG Chevrolet 30cwt with Breda 20mm

X-Craft mini submarine

USA:
Holt 75
Holt 120
Holt 5T

M2A4
M3 Stuart
M3A1 Stuart
M5 Stuart
M5A1 Stuart
M4A3
M4A3-76
M4A3-105
M4A3 HVSS
M7 Priest (3-piece transmision)
M26 Pershing
M45 Pershing (105mm)
LVT-4 (armed, armoured)
M3A1 Scout car
M20 Command Car
Jeep
Jeep with .50cal MG
Jeep with .30cal MG
M4 HST class A
M4 HST class B

WACO Hadrian CG-4

Russia:
IS-1
IS-2
IS-2M
IS-3
T-26A
T-26B
XT-26
T-26-4 76mm
T-28
T-28 uparmoured
T-34-76
OT-34-76
T-34 85
OT-34-85
T-70
SU-85
SU-100
SU-122
SU-76
SU-76i
SU-85b
ISU-122
ISU-122S
ISU-152
ZSU-37
KhTZ-16
Na Ispug (Odessa) tank
BA-3 armoured car
BA-6 armoured car
BA-10 armoured car
BA-10M armoured car
Komintern tractor
Voroshilovets tractor
STZ-3
STZ-5 tractor
B-4 203mm Howitzer
M17 halftrack
ZIS-5
ZIS-5-BZ tanker
ZIS-6
ZIS-22 halftrack

Hungary:
Toldi I
Toldi IIa
Nimrod ( & L62)
Turan I
Turan II
Turan III
Zrinyi II
Csaba Armoured Car
Ansaldo 35M
Ansaldo 35M command
Raba Botond I
Raba Botond II

Italy:
Autocarro S-37 Protetto
CV-33 serie I
CV-33 serie II
CV-33 with 20mm cannon
CV-35
CV-35 with 20mm cannon
CV-35 Lance-flamme
CV-35 mod (L3/38)
M15-42
M15-42 Centro Radio
M42 Carro Commando
M42 Semovente 75 L18
M42 Semovente 75 L34
Autoproletta Lince

Breda-35 20mm AA
Cannone da 47/32

Iran
Praga AH-IV

Romania:
R1
R2
TACAM R2

Bulgaria:
T-11

Japan:
Chi-Ha
Shinhoto Chi-Ha
Ho-Ni
Ho-Ro
Shi-Ki
Type 95 Kurogane mk3
Type 95 Kurogane mk5 pickup

France:
Hotchkiss H35
Hotchkiss H38
Hotchkiss H39
Somua S35
Somua SAu40
Char B1
Char B1 bis
Unic P107 Engineer
Unic P107 Artillery
Unic P107 AFN

New Zealand:
Bob Semple Tractor Tank
Beaverette Mk2
NZ Pattern Wheeled Carrier Mk2
Bren Carrier LP1
Bren Carrier LP2
Staghound I (NZ)
Staghound II (NZ)
Stuart Hybrid

Australia:
Matilda II (Aus)
Matilda II CS (Aus)
Matilda II Frog

South Africa:
Marmon Herrington Armoured Car Mk I
Marmon Herrington Armoured Car Mk II MFF
Marmon Herrington Armoured Car Mk II ME

Canada
Ram I
Ram I Kangaroo
Ram II
Ram II Kangaroo
Ram II OP
Badger Flamethrower
Wasp IIc
Sexton II
Sexton II GPO
Fox armoured car
Chevrolet 1533x2 30cwt GS truck
Chevrolet 1543x2 3T GS truck
CMP C15A-GS 15cwt truck
CMP F15A-GS 15cwt truck
CMP C60L-GS 3t truck
CMP F60L-GS 3t truck
CMP C60L-AMB Ambulance
CMP F60L-AMB Ambulance
CMP C60L-M-GAS Petrol Tanker
CMP C60L-WATER Water Tanker
CMP F60L-WATER Water Tanker
CMP C60L-Command HP & LP

Sweden
Strv m/37
You are not logged in


Reviews
There are no reviews yet.