A Worrywart’s Resin Printing FAQs, Part Deux
As an Amazon Associate Wargaming3D.com will earn from qualifying purchases.
Back in the Before Times I wrote up an article outlining my trepidatious journey into resin printing. That article, a Worrywarts Hesitant Plunge into the Resin Pool,
outlining how I quickly lost my inhibitions about resin printing and consider it a perfect partner for my FDM printer- they make a great team- one can’t replace the other, but each does certain things very well and the other picks up the slack.
I have done up this article as a follow up, as I have seen several FB posts of people getting into resin printing but whom have some questions as to how and what to do after they make that first big step. I offer this with the upfront statement that I am not a professional, I am not an engineer, I am just an avid fan of the hobby and I understand that 3d printing is still a bit of a dark science and you just can’t go down to the local hardware store and ask for help when you have a question.
With that in mind and understanding that many others may have different thoughts and opinions on all these points, please accept that these are my own experiences and opinions and are supplied with the best of intentions. There are many smarter and more knowledgeable people out there and please do tap into their experiences as well.
Are There Any Good Online Resources?
You will invariably run into questions and while there are many sites out there I have found the most reliable “go-to” site for me is this –
This site has the right balance of giving very concise advice without oversimplifying or expected you to be an electrical engineer, two faults evident on other online 3D sites.
What Brand of Resin should I use?
There are a wide range of resins out there. Be careful not to “shotgun” your resin purchase; when you do find one that works well and gives you consistent results, stick with it. Do not get tempted to try random resins; whatever you save in price will be lost in bad prints. The specifics settings for each brand needs to be dialed in your settings. You only find out if your settings are wrong when your print fails. Once you get it dialed in with a good resin, stick with it and stock up – I prefer Elegoo, but I have an EPAX printer, and I know most makers market their own.
I avoid the translucent ones and stick with the opaque ones. That is just a personal suggestion, but one I adhere to. That, of course, would depend on what you are seeking to print, but my printing is all table top historical items.
What do I do after the print is complete?
Resin printing is quite different than FDM in the post-print process. With FDM (filament) printing, you just snap it off the print bed, carefully clean off the support material and you are good to go. Not so for resin printing.
You will no doubt have read about the need for Nitrile gloves and safety glasses when doing the necessary post-print processing. I will assume you have those already.
I also suggest you set up a spot specifically for the cleaning process. Start with a set of these, simple cafeteria style plastic trays.
I got mine from Amazon, but they are widely available from other locations. They serve to capture any spills of resin and other liquids.
I placed one under my printer and a second as the catch tray for my cleaning station.
When your print is complete, you need to scrape the print off the printer base plate. You need to be ready (gloves/eye protection), and I suggest you have two of these – plastic pickling jars with strainers.
Again, the link is to a Cdn. Amazon site, but they are available in local hardware stores and the like – the beauty is they have the internal strainer, so you can lift the printed parts out, and they seal well.
You fill one with IPA (Isopropyl Alcohol) that is at least 90 % – I buy 99% IPA at Costco in a four pack, and it is quite reasonable. Try to keep a good stock on hand; early in the Covid pandemic it was very hard to come by – quite understandably – but the supply seems to be better now.
The second is filled with tap water.
With the print complete, scrape the print into the IPA filled tub. Secure the lid and shake it for 15 seconds or so. Pull the parts out of the IPA tub and use small needle nose pliers and snips to gently remove all the support material. It is important to get the support material off now, before the print is cured. It should snap off easily. If it doesn’t do so, you will want to review your slicer settings for both the printing and support settings – I refer you back to the all3dp site for help on that.
With the support material removed, use an old toothbrush and the IPA and scrub the print. You are removing the surface liquid resin off the print. Plop them back into the IPA tub for another quick shake about and take them out again.
Then drop the printed part into the second tub filled with water. Secure that lid and give it a good shake.
Now remove the parts from the water and let them dry.
How do I do the Post Print Curing ?
UV curing is the next essential step for resin prints. Depending on where you live and how much sun is available to you, you can set them in a sun on a secure spot for a day and you will be fine. Turn them so the sun’s UV light can cure all sides.
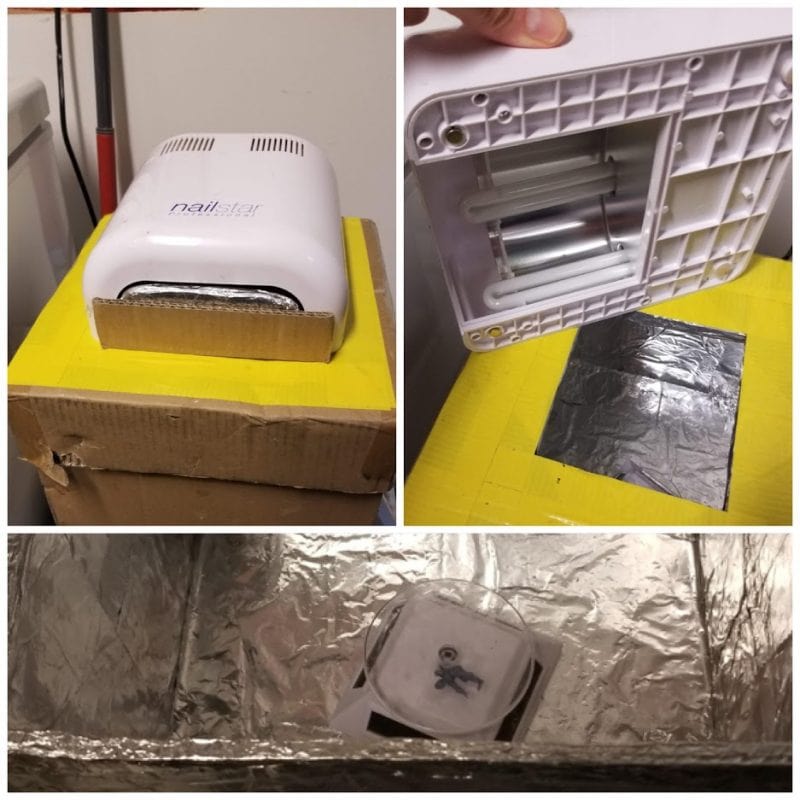
If, on the other hand, if you access to the sun is limited by geography, climate, or just the fact you have young kids or animals running about and you can’t just leave uncured resin parts laying about without the risk someone will try to chew on them, you will want to look at a UV curing station. These can be made quite easily with a UV lights or UV nail dryer, a small solar powered turn table and a cardboard box lined with aluminum foil (to reflect the light).
I used various online guides to construct my own. There are innumerable guides online for this, and I don’t want to limit your options, just google: “make your own UV light curing box” – there are solutions ranging from basic to over the top, but there are few wrong solutions.
I used a UV nail dryer light (photo below), and a solar powered turntable (photo below the UV light nail dryer). The turntable is small, you put your parts on it and the light from your UV source causes it to rotate your parts to equalize the light they receive.
This is my set up, tucked away into a spare square foot in the basement.
I leave the parts in for 30 minutes or so, turning them over for a second 30-minute course of curing.
What do I do with the trash/refuse/garbage?
Uncured resin is a toxic material and needs to be handled responsibly.
Your support materials and other uncured resin can be left in a safe spot in the sun to cure, or packed by for your hazardous material dump site (most communities have something of this ilk)
Same goes for old resin bottles, etc.
How about that water in the rinse tub? DON’T pour it down the drain!!! The tub is translucent. Once every few months leave it in the sun for a day or so; any resin therein will cure, you can then safely strain it and then pour the wastewater out. The small bits of cured resin then can safely disposed of
I have never had to deal with the IPA; I just keep filling the tub; it evaporates so quickly you will not normally end up having to deal with disposing of it. If you do, I expect if you just leave it in an open area, where it cannot be accessed by others, it will evaporate and leave any residue behind.
How do I Slice the .stls into g-code ?
Some of the .stls you will acquire may come pre-supported, which minimizes what you need to go when preparing to print. However, you still need to be familiar with operating a Slicer program for resin printing. My personal experience is primarily with Chitubox and Prusa (just because it is a Prusa slicer, don’t think it can’t work for other printers; the basic principles are pretty universal).
What about Slicing programs?/support placement? Etc.…. That is a big topic, and I suggest you read up online; there are multiple guides available. I have my own preferences, but they are likely based on my own limited experience with the one resin printer I have – just like with car fuel economy – “your results may vary”.
The primary things you need to consider are
- The print needs to be angled to the bed; the standard is 46.5 degrees from the bed; the nature of the resin print process abhors a flat surface to the bed.
- Support placement – the Slicer (Chitubox, Prusa or others) will have an automatic support placement feature. You can usually rely on this, but it will let you down occasionally though, so I use the manual setting after the auto placement process and ensure there are no points that are not supported; I tend to err on the side of caution in regard to supports.
- Large items need to be hollowed; Chitubox does this very well. Items like artillery pieces or figures do not need this but large items with internal volume – think of a hull for the Sherman tank model – should be hollowed.
Think of this print as a cream puff shell – when you have it with a hard shell and an empty interior it is a thing of beauty. Imagine it with an interior full of wet dough… not so nice. If you don’t hollow your large volume print and add drain holes to those large items, the print will be full of resin that can’t be cured, as well as using a lot more resin. The step it to
- 1) angle the print
- 2) use the hollow feature ( this is a visual process – look there the hollowed areas are on the print)
- 3) Add drain holes (you want these at least 3 mm wide and deep enough to piece the print shell. The settings are easily adjusted on Chitubox).
- 4) place the drain holes on the underside of the model; and again this is only required for large volume prints
I hope this helps. Again, I am not an engineer nor a professional, but these are my experiences and observations, and I think they may be of assistance.
I hope this helps. Again, I am not an engineer nor a professional, but these are my experiences and observations, and I think they may be of assistance.
Happy Printing!
Marc / Deweycat